

Prerequisites
You should have a basic understanding of the knowledge pipeline and plugin development:Data Source Plugin Types
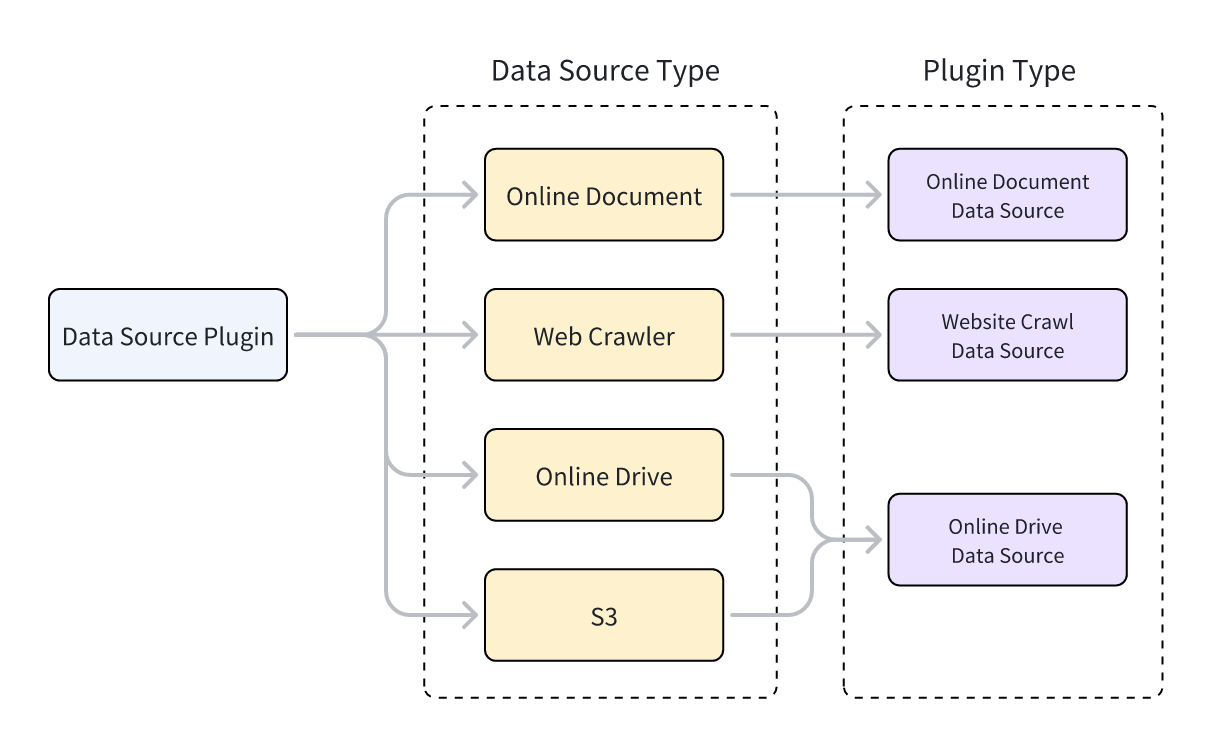
Dify supports three types of data source plugins: web crawler, online document, and online drive. Each type corresponds to a different parent class, and the class that implements your plugin’s functionality must inherit from it.To learn how to inherit from a parent class to implement plugin functionality, see Tool Plugin: Write the Tool Code.
- Web Crawler: Jina Reader, FireCrawl
- Online Document: Notion, Confluence, GitHub
- Online Drive: OneDrive, Google Drive, Box, AWS S3, Tencent COS
Develop a Data Source Plugin
Create a Data Source Plugin
Create a data source plugin with the scaffolding command-line tool by selecting thedatasource type. After you complete the setup, the tool generates the plugin project code.
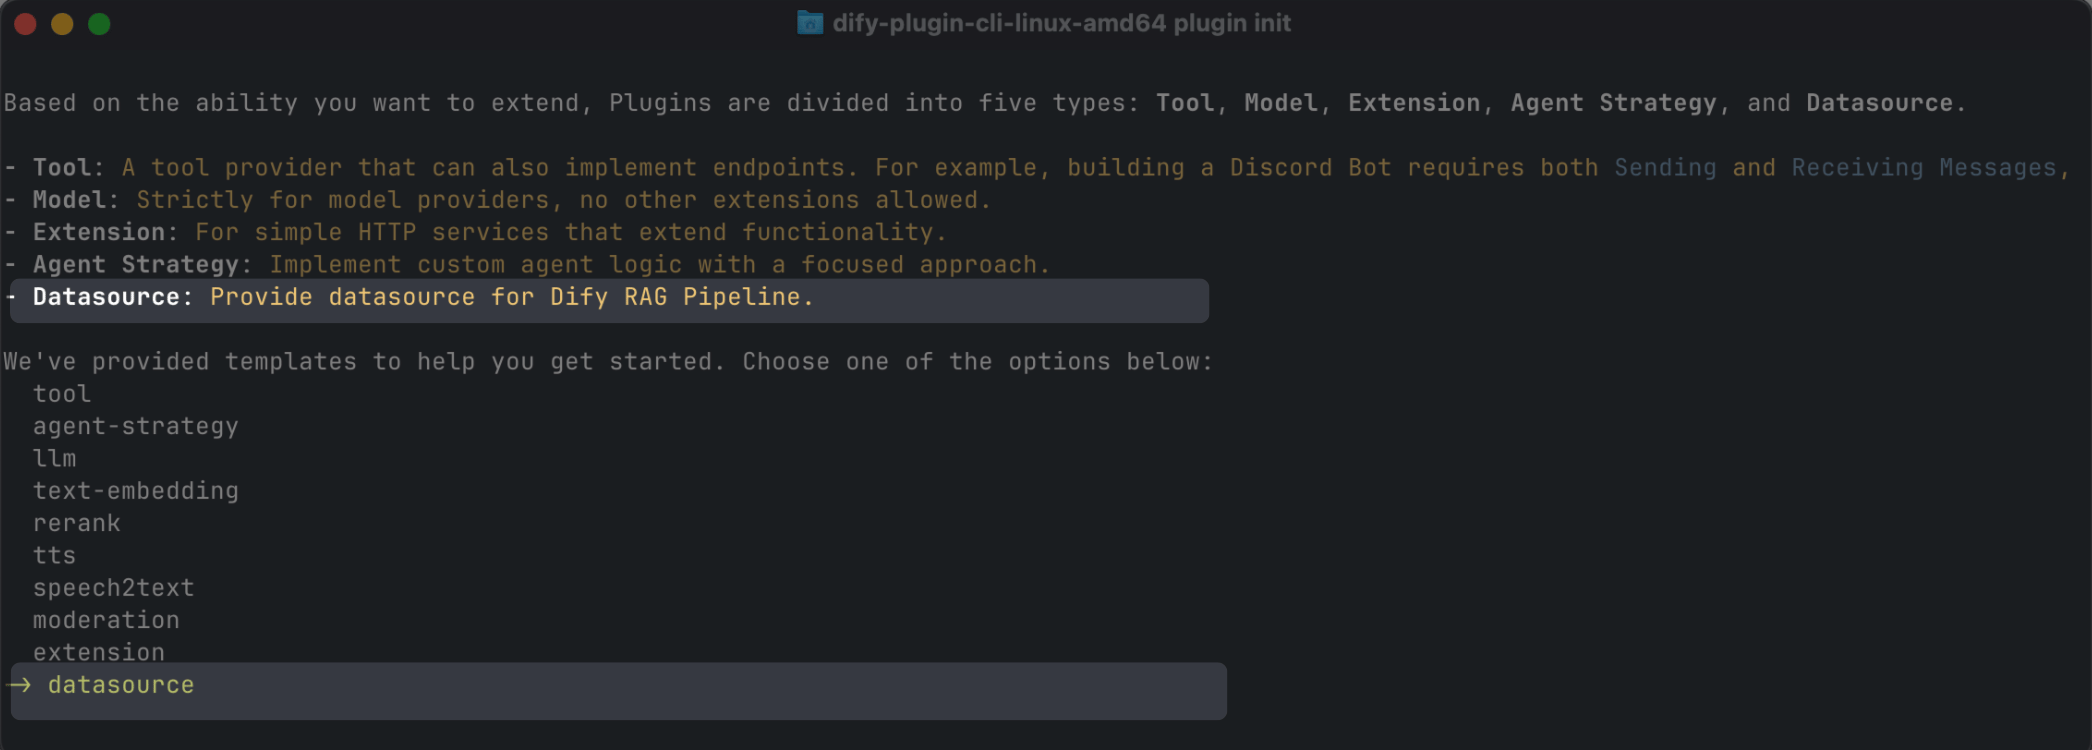
Typically, a data source plugin does not need to use other features of the Dify platform, so no additional permissions are required.
Data Source Plugin Structure
A data source plugin consists of three main components:- The
manifest.yamlfile: Describes the basic information about the plugin. - The
providerdirectory: Contains the plugin provider’s description and authentication implementation code. - The
datasourcesdirectory: Contains the description and core logic for fetching data from the data source.
Set the Correct Version and Tag
-
In the
manifest.yamlfile, set the minimum supported Dify version: -
In the same file, add the following tag so the plugin appears under the data source category in the Dify Marketplace:
-
In the
requirements.txtfile, set the plugin SDK version:
Add the Data Source Provider
Create the Provider YAML File
The content of a provider YAML file is essentially the same as that for tool plugins, with only the following two differences:For more about creating a provider YAML file, see Tool Plugin: Add Third-Party Service Credentials.
Data source plugins support authentication via OAuth 2.0 or API Key.To configure OAuth, see Add OAuth Support to Your Tool Plugin.
Create the Provider Code File
-
With API Key authentication, the provider code file is identical to that of a tool plugin. You only need to change the provider class’s parent class to
DatasourceProvider. -
With OAuth authentication, data source plugins differ slightly from tool plugins: when obtaining access via OAuth, they can also return the username and avatar to display on the frontend.
_oauth_get_credentialsand_oauth_refresh_credentialsmust therefore return aDatasourceOAuthCredentialsobject containingname,avatar_url,expires_at, andcredentials. TheDatasourceOAuthCredentialsclass is defined as follows:
_oauth_get_authorization_url, _oauth_get_credentials, and _oauth_refresh_credentials are as follows:
- _oauth_get_credentials
- _oauth_refresh_credentials
Add the Data Source
The YAML file format and data source code format vary across the three types of data sources.Web Crawler
In the provider YAML file for a web crawler data source plugin,output_schema must always return four parameters: source_url, content, title, and description.
WebsiteCrawlDatasource and implement the _get_website_crawl method, using the create_crawl_message method to return the crawl results.
To crawl multiple web pages and return them in batches, set WebSiteInfo.status to processing and call create_crawl_message for each batch of crawled pages. After all pages have been crawled, set WebSiteInfo.status to completed.
Online Document
The return value for an online document data source plugin must include at least acontent field to represent the document’s content. For example:
OnlineDocumentDatasource and implement two methods: _get_pages and _get_content.
When a user runs the plugin, it first calls the _get_pages method to retrieve a list of documents. After the user selects a document from the list, it then calls the _get_content method to fetch the document’s content.
- _get_pages
- _get_content
Online Drive
An online drive data source plugin returns a file, so it must adhere to the following specification:OnlineDriveDatasource and implement two methods: _browse_files and _download_file.
When a user runs the plugin, it first calls _browse_files to get a file list. At this point, prefix is empty, indicating a request for the root directory’s file list. The list contains both folder and file entries. If the user opens a folder, _browse_files is called again, and the prefix in OnlineDriveBrowseFilesRequest is the folder ID used to retrieve the file list within that folder.
After a user selects a file, the plugin uses the _download_file method and the file ID to get the file’s content. You can use the _get_mime_type_from_filename method to get the file’s MIME type, allowing the pipeline to handle different file types appropriately.
When the file list contains multiple files, you can set OnlineDriveFileBucket.is_truncated to True and OnlineDriveFileBucket.next_page_parameters to the parameters needed to fetch the next page, such as the next page’s request ID or URL, depending on the service provider.
- _browse_files
- _download_file
prefix, bucket, and id variables have special uses and can be applied flexibly as needed during development:
prefix: Represents the file path prefix. For example,prefix=container1/folder1/retrieves the files or file list from thefolder1folder in thecontainer1bucket.bucket: Represents the file bucket. For example,bucket=container1retrieves the files or file list in thecontainer1bucket. This field can be left blank for non-standard S3 protocol drives.id: Since the_download_filemethod does not use theprefixvariable, the full file path must be included in theid. For example,id=container1/folder1/file1.txtindicates retrieving thefile1.txtfile from thefolder1folder in thecontainer1bucket.
Debug the Plugin
Data source plugins support two debugging methods: remote debugging and installing the plugin locally. Note the following:- If the plugin uses OAuth authentication, the
redirect_urifor remote debugging differs from that of a local plugin. Update the relevant configuration in your service provider’s OAuth App accordingly. - While data source plugins support single-step debugging, we still recommend testing them in a complete knowledge pipeline to ensure full functionality.
Final Checks
Before packaging and publishing, make sure you’ve completed all of the following:- Set the minimum supported Dify version to
1.9.0. - Set the SDK version to
dify-plugin>=0.5.0,<0.6.0. - Write the
README.mdandPRIVACY.mdfiles. - Include only English content in the code files.
- Replace the default icon with the data source provider’s logo.
Package and Publish
In the plugin directory, run the following command to generate a.difypkg plugin package:
- Import and use the plugin in your Dify environment.
- Publish the plugin to Dify Marketplace by submitting a pull request.
For the plugin publishing process, see Publishing Plugins.
Edit this page | Report an issue